
08 November 2014
November pattern sale
It's been a while since I did anything on here, and although I've got new patterns to finish writing and load onto the site, I just haven't seemed to find the time lately. So I thought I might have a bit of a knitting pattern sale for the rest of the month. My paid patterns can all be found here: Ravelry pattern page. If you select one to buy the 15% discount is automatically added, yay. So if you're looking for a new knitting or crochet pattern, then you might want to give one of my patterns a go, and save yourself 15%


12 April 2014
How to block a hat after knitting
When it comes to knitting, I've always struggled with how to block a hat after knitting. There's no doubt that blocking your knitting makes a huge difference, but I've never really known how to do it with a hat. When I block other 'flat' items, I usually either wet and pin to shape on a thick towel, and leave to dry. If I'm feeling particularly lazy, and it isn't a design that stands up, then I place a wet muslin cloth over the item and lightly press. In the past I have been known to roll a towel up, and then press a hat with my iron, again with a wet muslin, but it's not a great result. Suddenly the other day, I got inspired.......


How to block a hat after knitting
- First of all, gently wash your hat. This makes it wet (obviously) but seeing as I was in this case making a baby hat, I like to give them a wash before gifting them.
- Gently squeeze out most of the water, try not to be too rough or you might stretch or alter the shape of the item.
- Hold the hat open, place a balloon in the opening, and begin to inflate.
- Do not fully inflate. Blow the balloon up to the point where the hat is sitting on it completely open, but without being stretched too much.
- Allow to dry.
- Remove hat from balloon.
So there you have it, how to block a hat after knitting. How do you do it?
31 January 2014
Quick valentine's day knitted gifts
Here at three bags full, we might not have the biggest, or most complicated range of gifts, but one thing that we do cater for, is a quick valentine's day knitted gift. For the past three, of four years now, we've added a few last minute valentine's day gifts to our range of free knitting and crochet patterns.


Last minute valentine
It all started a few years back when I suddenly remembered that the next day was valentine's day, and I hadn't got a card for my husband. I did have needles and red yarn though, so after a hunt for quick valentine's day knitted gifts, I decided to make my own. The I love ewe last minute valentine was born.A crochet valentine
The following year, I decided to stick with the theme, but rather than a knitted heart I went for a crochet heart instead. I love ewe ; another last minute valentine was the end result. I have to admit, that it's not quite as much fun as the original, but I love it all the same.

It was a while before I decided to come up with another one, and instead recreated my knitted and crochet hearts in different ways first.
Free Heart Knitting Pattern
A few years down the line though, I wanted to try something a little different. Back to quick valentine's day knitted gifts this time round, and another free heart knitting pattern, and another cheesy name (sorry). The end result was the wool you be mine?
I haven't quite decided what I'll do this year, and if we might end up with yet another quick valentine's day knitted gift, or if I'll recreate one of my old patterns. If you decided to use one of my free heart knitting or crochet patterns, then I'd love to see some pictures.
24 January 2014
Baby gifts
I mentioned in a recent post, that I had quite a few friends having babies soon. I started just the other day on one of my all time favourite baby creations, the Hamish sandal. I've made this heaps of times now as a baby gift, and when it comes to quick baby gifts, it's my go to pattern.
Although it's called the Hamish sandal, after the little baby boy that I created the first one for over 4 years ago now, it's a great pattern because it works just as well for girls as for boys. This time was for a little girl again, and following with tradition I went for a lovely pastel pink. In fact it was the last of my elan organic merino yarn, but I can get at least two pairs out of one 50g ball, so we might manage another soon.


So, that's my first new baby project down. I've also got a nearly finished little green cardigan for a baby who's flavour is as yet unknown, but with little green ladybird buttons I think it will suit a boy or girl. Then it's onto a few more crochet baby shoes, and I also want to crochet a baby blanket for a special friends first baby. I just need to decide on a pattern, my twinkle twinkle blanket or something else.......
Although it's called the Hamish sandal, after the little baby boy that I created the first one for over 4 years ago now, it's a great pattern because it works just as well for girls as for boys. This time was for a little girl again, and following with tradition I went for a lovely pastel pink. In fact it was the last of my elan organic merino yarn, but I can get at least two pairs out of one 50g ball, so we might manage another soon.
12 January 2014
Preemie singlet - free knitting pattern
This is a very simple pattern, that I drafted after getting a request for some premature singlets from New Zealand charity Earlybuds. They do a great job of providing packs of essentials for parents with babies in NICU in New Zealand. Please feel free to use this pattern for your own use, and if you want to knit some items for earlybuds if you're in New Zealand, or your local hospital's NICU. It might be worth checking what they want or need first though.
4mm circular needles or dpns.

Join in the round
knit 2 purl 2 around, this will form 2x2 rib
Continue working 2x2 rib until work measures 17cm, (7inches) long
Next round: Cast off six stitches
Work with next four stitches ONLY, knit 18 rows, cast off these four stitches.
Reattach yarn, cast off 14 sts, work with next four stitches ONLY, knit 18 rows, cast off these four stitches.
Reattach yarn cast off 12 sts, work with next four stitches ONLY, knit 18 rows, next row k1 yo ktog kt1, knit one more row, cast off.
Reattach yarn co 14 sts, work with next four stitches ONLY, knit 18 rows, next row k1 yo ktog kt1, knit one more row, cast off.
Reattach yarn and cast off remaining 6 sts.
Weave in ends, add buttons to shoulders.

Premature vest
The vest is designed to be knit in pure wool, as natural fibres are better for such small babies. It is knit in the round, so there are no seams which may irritate, and is ribbed so that it will grow with the baby. The shoulders have sleeves to give easy access to add wires and the like. The vest will fit from around 34 weeks, but you could easily make larger or smaller by casting on more or less stitches.
What you need
8ply/dk yarn, (one 50g ball will do approx 2 vests)4mm circular needles or dpns.
Free Preemie singlet knitting pattern
Cast on 68 sts on either dpns or circular knitting needlesusing your favourite casting on method, I prefer to use a nice stretchy cast on.Join in the round
knit 2 purl 2 around, this will form 2x2 rib
Continue working 2x2 rib until work measures 17cm, (7inches) long
Next round: Cast off six stitches
Work with next four stitches ONLY, knit 18 rows, cast off these four stitches.
Reattach yarn, cast off 14 sts, work with next four stitches ONLY, knit 18 rows, cast off these four stitches.
Reattach yarn cast off 12 sts, work with next four stitches ONLY, knit 18 rows, next row k1 yo ktog kt1, knit one more row, cast off.
Reattach yarn co 14 sts, work with next four stitches ONLY, knit 18 rows, next row k1 yo ktog kt1, knit one more row, cast off.
Reattach yarn and cast off remaining 6 sts.
Weave in ends, add buttons to shoulders.
29 December 2013
Favourite knitting patterns for babies
I have quite a few friends having babies at the moment, and I thought that it was time I dusted off the knitting needles, hunted out my favourite knitting patterns for babies and got to work. Sometimes, just knowing what kind of thing you want to knit is half the battle, and it's always good to have a few ideas lined up.


For something with a little more to it, then I don't think that you can go very far wrong with my oscar knobbly cable hat (picture above) or barley twist cable hat, both of which come with patterns for matching mittens. Perfect gifts for baby showers or for a newborn.

My favourite knitting patterns for babies
When it comes to knitting for newborn babies, I don't think that you can go far wrong with a cardigan. A simple little top that you can slip on, is always handy, cardigans, with buttons down the front, are far easier to get onto a tiny baby than a jumper that you slip over the head. They are also ideal in both winter and summer, and always look cute.
I have a basic cardigan pattern, and the Anja knitting pattern to release in the coming months, but in the mean time, the Lena cardigan is a cute option, or the Snowdrop wrap cardigan is another handy pattern.
Baby hat knitting pattern
Some of my favourite knitting patterns for babies are those for hats, a little woolly hat is always a handy addition to a newborn's wardrobe, and they are usually simple and quick gifts to knit up. One of the most simple is my simple baby hat. It's so simple that it's not really a pattern as such, but it is a good place to start, and works well as a blank canvas for adding your own embellishments.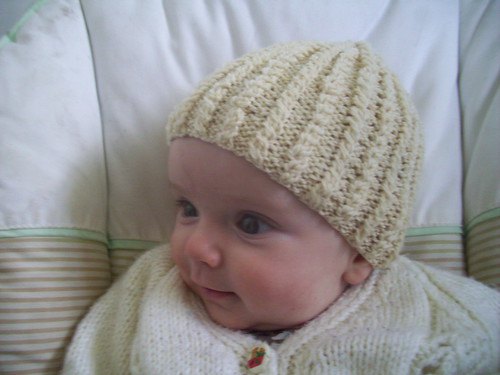
Something a little different?
Want to knit something a little different as a gift? If the baby in question is going to be in cloth then a soaker pattern might be something to consider. We have a free one on this blog that is fairly easy to knit.

So there you have it, a quick round up of my favourite knitting patterns for babies.
07 November 2013
Knitting needle sale
Just a quick one today, as I'm focusing more on the knitting pattern side of things with 3 bags full now, I'm going to be selling off my remaining bamboo knitting needles. They are mostly circular needles, in various lengths and sizes, although I have a few other things as well.
If you're interested, check out the pinned post at the top of our facebook page, I can post worldwide.

If you're interested, check out the pinned post at the top of our facebook page, I can post worldwide.
08 October 2013
New patterns........ soonish
Well, it seems that months go by without me posting anything here, and for a long time now I've been promising new patterns. Part of the problem is that I'm just not getting very much knitting done. I can't hold her entirely responsible, but as I usually knit and crochet in the evening, and my littlest girl isn't sleeping particular well at the minute, I'm not getting a great deal done. She is very cute though.

Of course that's really just an excuse, and to be honest I'd lost my knitting mojo for a while there. Not sure why, but some times these things just go awol for a bit. Any way, I've got a couple of new things on the needles; a cardi for me (which, being for me, may never happen) and a premie vest for Early Buds. I want to check that it's what they're looking for, but if all works out ok, I'll be releasing it as a free pattern. It's a very simple knit in the round job, but when they asked for singlets with buttons at the shoulder (due to all the wires and the like that are attached to the babies) I couldn't find quite the right pattern, and certainly not one that was knit in the round. (Which not only means that there is no sewing up to be done - yay, but it also means no bulky seams to irritate little babies.) I hope to be able to tell you more soon.....

Of course that's really just an excuse, and to be honest I'd lost my knitting mojo for a while there. Not sure why, but some times these things just go awol for a bit. Any way, I've got a couple of new things on the needles; a cardi for me (which, being for me, may never happen) and a premie vest for Early Buds. I want to check that it's what they're looking for, but if all works out ok, I'll be releasing it as a free pattern. It's a very simple knit in the round job, but when they asked for singlets with buttons at the shoulder (due to all the wires and the like that are attached to the babies) I couldn't find quite the right pattern, and certainly not one that was knit in the round. (Which not only means that there is no sewing up to be done - yay, but it also means no bulky seams to irritate little babies.) I hope to be able to tell you more soon.....
15 June 2013
Big sale!
I've changed direction in recent years, those of you who noticed the name change might have picked up on that one. These days I'm mostly doing hand dyed yarn, buttons and hopefully I'll have some new patterns to release soon....
This change does mean one thing though, I need to have a bit of a destash of my commercially dyed yarn, so if you fancy grabbing some, you might want to pop along to my facebook page http://www.facebook.com/3bagsfullnz now, and check it out.....
This change does mean one thing though, I need to have a bit of a destash of my commercially dyed yarn, so if you fancy grabbing some, you might want to pop along to my facebook page http://www.facebook.com/3bagsfullnz now, and check it out.....
15 April 2013
Competition time!
Just thought I'd mention that I've got a bit of a give away running at the moment, with over $200 (NZ) worth of prizes. If you're interested you might like to checkout our facebook page and the hive and keep an eye out for my naughty kitten, who's been spreading my yarn around across facebook.....


13 February 2013
Wool you be mine? Free heart knitting pattern
Yet another last minute valentine, one of these days I'll get myself sorted sooner and not have to make these last minute. Gauge isn't important, and you can use any spare yarn that you have lying around.
Materials
Small amount of red yarn (I used Aran/10ply)
Suitable needles for gauge (4.5mm in my case)
Glue
Card
Abbreviations
Small amount of red yarn (I used Aran/10ply)
Suitable needles for gauge (4.5mm in my case)
Glue
Card
Abbreviations
K knit
P Purl
M1 make one
K2tog knit two stitches together.
Pattern
Bottom of heart
Cast on Two stitches
Row 1: K
Row 2: P1, m1, p1
Row 3: k1, p1, k1
Row 4: P1, m1, k1, m1, p1.
Row 5: K1, p to last stitch, k1.
Row 1: K
Row 2: P1, m1, p1
Row 3: k1, p1, k1
Row 4: P1, m1, k1, m1, p1.
Row 5: K1, p to last stitch, k1.
Row 6: P1, m1, k to last stitch, m1, p1.
Repeat rows 5 and 6 until the bottom of the heart is roughly the size that you want, (in my case 17 stitches) end with a row 6.
Repeat rows 5 and 6 until the bottom of the heart is roughly the size that you want, (in my case 17 stitches) end with a row 6.
Next row: K1, p to 1 stitch before centre of heart p1, cast off middle stitch (make sure you are left with an equal amount of stitches on each side, k1, p to last stitch, k.
Knit to centre of heart, (for me 10 stitches) turn leaving rest of the stitches un-worked.
Knit to centre of heart, (for me 10 stitches) turn leaving rest of the stitches un-worked.
Top of heart shaping
Row 1: P1, k to last stitch before cast off stitch, p1, turn.
Row 2: K2tog, p to last 2 stitches, k2tog.
Row 1: P1, k to last stitch before cast off stitch, p1, turn.
Row 2: K2tog, p to last 2 stitches, k2tog.
Row 3: P2tog, k to last 2 stitches, p2tog.
Continue until one stitch remains, fasten off.
Next re-attach yarn to un-worked stitches, work rows 1 -3 above on these stitches.
Making up
Weave in ends, and then glue to front of a card.
Write the card and give it to a loved one.
Making up
Weave in ends, and then glue to front of a card.
Write the card and give it to a loved one.
© COPYRIGHT Kelly Jo Sweeney 2013
This pattern is offered free of charge for your own personal use. Please do not make items using this pattern for sale. Should you wish to sell items made from this pattern, then please contact me for details of my Cottage Industry Licenses.
For yarns, more free patterns and knitting and crochet accessories, please see my site: http://www.wonderwool.congocart.co.nz
23 January 2013
Textured Dishcloth - free knitting pattern
Textured dishcloth
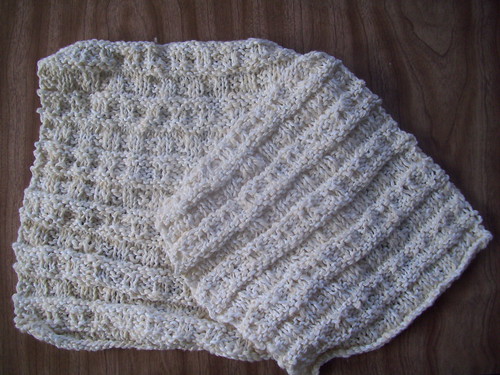
This pattern includes three different sizes of dishcloth, small (approx 17cm x 20cm), medium (approx 22cm x 24cm) and large (approx 28cm x 28 cm), or you can custom make one to your own size. A 50g ball of DK cotton yarn should be enough to make at least two cloths.
The pattern is worked on 4mm knitting needles, to give the following gauge:
30 rows to 10cm/4inch
21 sts to 10cm/4 inch
Cast on 36 (48, 60) stitches
Row 1: K
Row 2: P
Row 3: K1, p2, *k2, p2, repeat pattern from * to last stitch k1
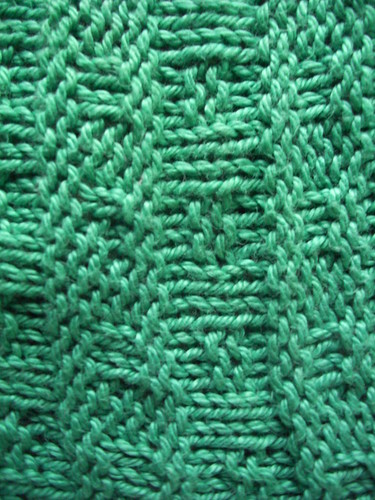
Row 4: P1, k2, *p2, k2, repeat pattern from * to last stitch p1
Row 5: K
Row 6: P
Row 7: P
Row 8: K
Row 9: P1, k2, *p2, k2, repeat pattern from * to last stitch p1
Row 10: K1, p2, *k2, p2, repeat pattern from * to last stitch k1
Row 11: P
Row 12: K
These 12 rows make up the pattern. Repeat all rows for 5 (6, 7) time in total.
Cast off.
© COPYRIGHT Kelly Jo Sweeney 2010
This
pattern is offered free of charge for your own personal use. Please do
not make items using this pattern for sale. Should you wish to sell
items made from this pattern, then please contact me for details of my
Cottage Industry Licenses.
For yarns, more free patterns and knitting and crochet accessories, please see my site: http://www.wonderwool.congocart.co.nz
06 January 2013
Last minute valentine - free knitting pattern
Last minute valentine

Materials
Small amount of red yarn (I used dk)
Suitable needles for gauge (4.5mm in my case)
Glue
Card
Bamboo coctail sticks
Pattern
Cast on Two stitches
Row one
Knit
Row two
Inc two stitches by knitting in the back and front of both stitches
Row three
Knit
Row four
Knit into back and front of first stitch knit to end knit into back and front of last stitch.
Row five
Knit
Repeat rows four and five until the bottom of the heart is roughly the size that you want, (in my case 20 stitches) end with a knit row, no inc.
Next row
Knit to centre of heart, (for me 10 stitches) turn leaving rest of the stitiches unworked.
Next row
Knit 2 together knit to last two stitches, knit two together.
Repeat this row until only two stitches remain, leave these on needle, and cut wool.
Next re-attach yarn to unworked stitches.
Next row
knit
Next row
Knit 2 together, knit to last two stitiches, knit two together
Repeat until only two stitches remain. Cut thread leaving long tail.
Making up
Sew in shorter ends but leave long end loose.
Thread a coctail stick into the four stitches you have left, glue the heart and coctail sticks to the card.
Wind the long thread into a flat circle shape and glue onto card so that it looks like the ball of wool that is being knit with.
Write the card and give it to a loved one.
© COPYRIGHT Kelly Jo Sweeney 2010
This pattern is offered free of charge for your own personal use. Please do not make items using this pattern for sale. Should you wish to sell items made from this pattern, then please contact me for details of my Cottage Industry Licenses.
For yarns, more free patterns and knitting and crochet accessories, please see my site: http://www.wonderwool.congocart.co.nz
28 December 2012
Simple baby hat free knitting pattern
I had some left over bamboo wool, and wanted to do a bit of practising with knitting in the round; my simple baby hat was born. You could use any scrap or left over wool for this, but the I found the bamboo quite stretchy, so you may need to cast on more stitches with a less stretchy yarn.
I knit the simple baby hat with a set of double pointed needles (dpn's) there's no reason why you couldn't do it with circular needles using the magic loop technique.
I knit the simple baby hat with a set of double pointed needles (dpn's) there's no reason why you couldn't do it with circular needles using the magic loop technique.
Simple baby hat free knitting pattern

What you need
To fit six month old baby approx.
4 double pointed needles, I used 3.5 mm ones
DK yarn, I used sirdar snuggly bamboo dk (about 1/2 a ball)
Cast 76 on stitches, putting an even amount onto three of the needles, leaving the fourth to knit with, knit the first round, joining together to form a round when you reach the end.
Now p1 round, k1 round, continue for 6 rounds.
Continue k each round until the work measures 14cm, or as long as you want it.
Cast off.
Turn the tube of knitting inside out, fold the top and sew together, across the top.
Turn the right side out, and there you have it, a very simple baby hat, knit in the round.
© COPYRIGHT Kelly Jo Sweeney 2009
This pattern is offered free of charge for your own personal use. Please do not make items using this pattern for sale. Should you wish to sell items made from this pattern, then please contact me for details of my Cottage Industry Licenses.
18 December 2012
Knitted San Pad - free pattern knitted cloth menstrual pad
I wrote this pattern for a knitted sanitary pad a good few years ago now, but decided to come back and update it a little now. It is a free knitting pattern, and you are more than welcome to make as many as you want for your own uses or charity. Should you wish to make them to sell, then please get in touch with me first.
I've used cloth menstrual pads for a long time, and when I created this I was wondering if a knitted one would work. I used a cotton yarn, but other fibres may well work. It is knit using the 'double knitting' technique. This means that you knit it flat, but it is knitted in one piece. It sounds, really complicated, but in fact isn't, and creates a knitted menstrual pad with very little sewing up to do. (Yay) Please try it, and if you have any problems, let me know, I will see what I can do to help.
Any way, enough of that, here it is, the knitted menstrual pad pattern (free).


I've used cloth menstrual pads for a long time, and when I created this I was wondering if a knitted one would work. I used a cotton yarn, but other fibres may well work. It is knit using the 'double knitting' technique. This means that you knit it flat, but it is knitted in one piece. It sounds, really complicated, but in fact isn't, and creates a knitted menstrual pad with very little sewing up to do. (Yay) Please try it, and if you have any problems, let me know, I will see what I can do to help.
Any way, enough of that, here it is, the knitted menstrual pad pattern (free).
Knitted Sanitary Pad
By Kelly-Jo Sweeney


This cloth menstrual pad/san-pro is knitted flat, but uses the double knitting technique, so that there is no sewing up required. It has a hole in the back which you can use to stuff the pad with either knitted pads, or pieces of cloth, depending on how much and what you want to add. It is very important that you slip stitches when told, as to knit (or purl) them will stop the technique from working. As you work, you will have the inside of the work facing you.
I knitted the pad in cotton yarn, but other yarns might also work well, I'd be interested in hearing of any other yarns that you have tried and how they worked. Feel free to give me feedback on the pattern too. You can contact me here.
You will need;
Small amount of DK yarn of your choice
1 button
pair of 5mm knitting needles
Stitch marker
Terms used;
k knit
p purl
sl slip stitch purlwise
PM place marker
YO yarn over.
K2tog knit two stitches together.
For the main pad;
Cast on 32 stitches
Row 1; k1, sl1, continue to end, turn.
Row 2; As row 1.
Continue in this way for 30 rows in total.
Make back opening;
Row 1; k1, sl1 to centre of work, 8 stitches. PM, turn.
Row 2; sl1, p1 to end, turn.
Row 3; sl1, p1 to end, turn.
Row 4; sl1, p1 to marker, turn.
Row 5; k1, sl1 to end, turn.
Row 6; k1, sl1 to end, turn.
Row 7; k1, sl1 to marker, turn.
Repeat rows 2 to 7 11 more times and then repeat row 2 to 6 once.
Next row; k1, sl1 to marker, remover marker and k1, sl1 to end, turn.
Next row; k1, sl1 to end, turn.
Work 28 more rows like this.
Cast off.
Now turn the whole thing inside out, through the hole that you created on the back, so that the right side is now facing you.
Making the tabs;
Fold the piece in half lengthwise. Count back four stitches from the centre.
With the top of the pad facing you, on the side of the piece pick up and knit eight stitches.
Row 1; P.
Row 2; K.
Work four more rows like this. *
Next row; k3 stitches, yo k2tog, k3 stitches.
Next row p.
Next row, cast off stitches.
Second tab;
Repeat the process as above, as far as *
Work two more rows and then cast off.
Weave in all ends and sew on buttons.
Inner Pads;
Cast on 16 stitches.
K each row until pad measures just shorter than the outer. Cast off.
If you have any thoughts on our knitted cloth menstrual pad, then I'd love to hear them, either in the comments or on our facebook page.
If you have any thoughts on our knitted cloth menstrual pad, then I'd love to hear them, either in the comments or on our facebook page.
© COPYRIGHT Kelly Jo Sweeney 2010
This pattern is offered free of charge for your own personal use. Please do not make items using this pattern for sale. Should you wish to sell items made from this pattern, then please contact me for details of my Cottage Industry Licenses.
06 December 2012
Purple day
I thought I'd have an entry that wasn't a pattern being moved over for a change, so here goes...... I've spent the other day dying up some yarn. I need to add quite a bit of stock to my store over at wonderwool so with a nice warm day on Tuesday, I thought that I'd better make a start.
I've got quite a few new dyes to use, but I wanted to use up some of my almost finished ones first. I've got quite a bit of hot pink, navy blue and red left, and I wondered if I could manage to get some different effects with just those colours. I had a play around, and this was the result:

I'm really quite pleased with the results. The closest one is merino possum, which effects the way the colours take, and the other two are 100% wool, really love the way that they look though, so tempted to keep them and use them myself........
I've got quite a few new dyes to use, but I wanted to use up some of my almost finished ones first. I've got quite a bit of hot pink, navy blue and red left, and I wondered if I could manage to get some different effects with just those colours. I had a play around, and this was the result:

I'm really quite pleased with the results. The closest one is merino possum, which effects the way the colours take, and the other two are 100% wool, really love the way that they look though, so tempted to keep them and use them myself........
23 November 2012
Woolly Pants Pattern - free knitted soaker pattern
Free knitted soaker pattern
This is one of the first ever knitted soakers that I made, I tried a couple from other patterns and then thought that I could create something myself. Woollen soakers are great for over cloth nappies, especially at night, as they are breathable and natural, so great for babies. 100% wool is best, and if you can, hand wash only. Treat your soaker with a small amount of lanolin, around peas sized (pure lanolin nipple creams can work) dissolved in warm water and a little wool wash. Soak your knitted soaker over night, and then allow to dry. You should only need to do this every few months, when it starts to smell, allow it to air between uses unless actually soiled.
Woolly pants
This is a flat knit soaker, very simple and easy to make. You have the option of using either Worsted Weight (10ply) yarn, or DK (8ply) yarn, which will give a slightly smaller soaker. There is also the option of adding a textured body to the soaker. Directions are given for a small, or newborn size, and directions for medium (approx 6 months) and large (approx 1 year) follow in brackets.
You will need
Approx 50g of DK or 10ply yarn, I would recommend 100% wool.
1 pair 4mm knitting needles
1 pair 5mm knitting needles
1 wool needle for weaving in ends.
If you are planning on making a soaker with a textured pattern, then use the pattern bellow on all areas marked with an * in the main pattern.
Textured pattern for body of soaker
Row 1 k
Row 2 p1 k2 repeat to end
Row 3 k
Row 4 k1 p1 k2 repeat to end
Row 4 k
Row 6 k2 p1
(Use this pattern on all areas worked in stocking stitch, marked with a *, including the short rows.)
Pattern
Using 4mm needles, cast on 56 (62) (68) stitches.
Row 1, (k1 p1) continue to end, this forms the 1x1 rib.
Continue in 1x1 rib for 6 more rows
Next row, k1(k2tog yo k1) repeat to last stitch k1.
Then do 7 more rows 1x1 rib.
Row 1 k
Row 2 p1 k2 repeat to end
Row 3 k
Row 4 k1 p1 k2 repeat to end
Row 4 k
Row 6 k2 p1
(Use this pattern on all areas worked in stocking stitch, marked with a *, including the short rows.)
Pattern
Using 4mm needles, cast on 56 (62) (68) stitches.
Row 1, (k1 p1) continue to end, this forms the 1x1 rib.
Continue in 1x1 rib for 6 more rows
Next row, k1(k2tog yo k1) repeat to last stitch k1.
Then do 7 more rows 1x1 rib.
Change to larger 5mm needles.
Row 1 (inc one stitch each end) k all stitches* 58 (64, 62) stitches.
Row 1 (inc one stitch each end) k all stitches* 58 (64, 62) stitches.
Short rows:
Row 1, p34 (38, 42) slip stitch, turn*
Row 2, Slip stitch k10 (12, 14) slip stitch, turn*
Row 3, Slip stitch p15 (17, 19) slip stitch, turn*
Row 4, Slip stitch k24 (26, 28) slip stitch, turn*
Slip stitch p to end.*
Row 2, Slip stitch k10 (12, 14) slip stitch, turn*
Row 3, Slip stitch p15 (17, 19) slip stitch, turn*
Row 4, Slip stitch k24 (26, 28) slip stitch, turn*
Slip stitch p to end.*
Main body;
Continue in stocking stitch for 12cm (15cm, 18cm) not including rib band.*
Shaping for leg holes:
Row 1, dec 2 stitches each end, 54 (60, 64)*
Row 2 Dec 3 stitches each end. 48 (54, 58)*
Repeat these two rows three more times.
For smaller size only dec 1 stitch each end.*
For medium and large sizes only dec 2 stitches each end twice.* 16 (18, 18)
Continue in stocking stitch for 10 (12, 14) more rows.*
Increase 1 stitch at each end of each row 3 (5, 7) times. 22 (28, 32).*
Increase 4 (4, 6) stitches at each end.* 30 (36, 44)
Row 2 Dec 3 stitches each end. 48 (54, 58)*
Repeat these two rows three more times.
For smaller size only dec 1 stitch each end.*
For medium and large sizes only dec 2 stitches each end twice.* 16 (18, 18)
Continue in stocking stitch for 10 (12, 14) more rows.*
Increase 1 stitch at each end of each row 3 (5, 7) times. 22 (28, 32).*
Increase 4 (4, 6) stitches at each end.* 30 (36, 44)
Front:
Continue in stocking stitch to match back, 12 (15, 18cm).*
Change to 4mm needles, and work 6 rows in 1x1 rib.
k1(k2tog yo k1) to last stitch k1
Work 7 more rows in 1x1 rib.
Cast off.
Legs
Pick up 38 (42, 48) stitches around each leg hole,
Work 7 rows of 1x1 rib.
Cast off
Sew soaker together along front seams using mattress stitch.
Using double thickness of wool, and a 5mm crochet hook, chain a length long enough to use as a waist tie. Alternatively plait a length of wool. Thread this in the holes at the top of the soaker.
Change to 4mm needles, and work 6 rows in 1x1 rib.
k1(k2tog yo k1) to last stitch k1
Work 7 more rows in 1x1 rib.
Cast off.
Legs
Pick up 38 (42, 48) stitches around each leg hole,
Work 7 rows of 1x1 rib.
Cast off
Sew soaker together along front seams using mattress stitch.
Using double thickness of wool, and a 5mm crochet hook, chain a length long enough to use as a waist tie. Alternatively plait a length of wool. Thread this in the holes at the top of the soaker.

© COPYRIGHT Kelly Jo Sweeney 2011
This pattern is offered free of charge for your own personal use. Please do not make items using this pattern for sale. Should you wish to sell items made from this pattern, then please contact me for details of my Cottage Industry Licenses.
For yarns, more free patterns and knitting and crochet accessories, please see my site: http://www.wonderwool.congocart.co.nz
16 November 2012
Pattern making
I realised earlier that it's over a year since I last released a pattern, and that was a quick free crochet square, it's about time I launched something new. I really need to get myself together and get some of the patterns that I've been working on written up.
I showed you last time the cardigan that I made for Anja before she was born, but that's not all that I've had on my needles over the last year. There's also this wrap around sleepsuit;

 It was a little big for her when this was taken, and you don't have to scar your children for life by using such bright colours.....It's a great little outfit for keeping them warm in winter, and as it's a seamless top down construction, there isn't lots of sewing up to do either.
More recently I made a little cardigan for a friends new baby, quite a simple design this time, but cute all the same, and again; top down and seamless:
 So, there are things in the pipeline, I am working on them (vaguely) and at some point I will get them written up, tested and out there. At least, I hope I will.....
I showed you last time the cardigan that I made for Anja before she was born, but that's not all that I've had on my needles over the last year. There's also this wrap around sleepsuit;


More recently I made a little cardigan for a friends new baby, quite a simple design this time, but cute all the same, and again; top down and seamless:

02 November 2012
All change
Well, if you've ever been here before, you might notice that suddenly there's a different name. You might also notice that it's over a year since I last posted. So, what have I been up to? And what's happened to NZ wools?
Well, things have been quiet on that front for quite a while, and although I've been working on new patterns, and dying yarn, I haven't done a lot else. So earlier this year I decided to close NZ Wools, and become involved in a new site; wonderwool. Basically we now have a new store on there, along with a number of other New Zealand based wool crafters. Pop along and check us out if you haven't already.
We're also to be found on the hive NZ, another really great site.
So why have I been quiet for so long? Well, earlier this year we had another addition to our family, and welcomed our fourth child, (and second daughter).
Here she is, just two days old (back in June) modelling the cardigan and hat that I designed and made for her. The yarn is one of mine too, possum merino, hand dyed in yellow as we didn't know what flavour she was going to be.
So, as you can imagine, life has been busy, but we've got the new site up and running, and I have at least three new patterns for you. All I need now is time to write them down and get them tested...... Watch this space.
Well, things have been quiet on that front for quite a while, and although I've been working on new patterns, and dying yarn, I haven't done a lot else. So earlier this year I decided to close NZ Wools, and become involved in a new site; wonderwool. Basically we now have a new store on there, along with a number of other New Zealand based wool crafters. Pop along and check us out if you haven't already.
We're also to be found on the hive NZ, another really great site.
So why have I been quiet for so long? Well, earlier this year we had another addition to our family, and welcomed our fourth child, (and second daughter).
So, as you can imagine, life has been busy, but we've got the new site up and running, and I have at least three new patterns for you. All I need now is time to write them down and get them tested...... Watch this space.
24 September 2011
It's Wheely a square.... free crochet square pattern
 Sorry, yes I know that's a rubbish title. But it's the best I've got at the moment,and it will have to do. So, would you like to know how to make the square? Then I'm about to share the instructions. I made this last night for the CAL we're having on the New Zealand Nappy Network forum, basically we're doing a different block each week, and this week is my turn. I'm doing the instructions twice too, firstly with US terms, as most people seem to use those now, and then in British terms, which is what I prefer, seeing as it's what I learnt with. (If you're not sure what you know, then a good guide is that US uses single crochet, British doesn't, so if you know what a single crochet is, the chances are, you know US terms).
 US terms
You will need,
Yarn in various colours, for both squares I used 8ply/dk yarn.
 A crochet hook that suits your yarn, I used a 4mm hook.
A needle to weave in ends.
And a bit of spare time.
Abbreviations used
Ch: Chain
Slst: slip stitch
St: Stitch
Sc: Single crochet
Dc: Double crochet
Pattern
Ch 4, slst to first chain.
Round 1: Ch4 (this counts as 1dc and 1ch), *dc into centre of the ring, ch1,* repeat from * to * 6 more times, slst to 3ch of starting 4ch.
Round 2: Stst to first ch space, ch3, 2 dc in same ch space, dc in top of dc below, continue around with 3 dc in each ch space and 1 dc in top of each dc in round below. Slst to 3rd chain of starting ch3.
Round 3: Ch1, sc into same st, *chain 4, miss 3 dc and sc into next dc, ch6, miss 3dc and sc into next dc.* repeat from * to * 3 more times, but on last time, slst to first sc rather than making a new sc.
Round 4: Slst to ch space, ch 3, 2 dc into same ch space, ch 1, *3 dc into next chain space, ch3, 3 dc into same ch space, ch1, + 3 dc into next ch space.* repeat from * to* twice, and then from first * to + once. Slst to 3rd ch of 3ch.
Round 5: Ch4, 3dc into next ch space, ch1, work around square working 3dc into each ch space followed by 1ch on sides and 3 dc, 3ch and 3dc, 1ch into each corner. At last ch space 2dc, slst to 3rd ch of starting 4ch.
Following round: Repeat round 5 as often as required, on every even round start with ch3, and 2dc into same ch space, every odd row start with ch 4 as above.
Optional final round: Ch1, sc in each dc and ch space in round below, slst to first ch, fasten off.
UK Terms
Abbreviations usedCh: Chain
Slst: slip stitch
St: Stitch
Dc: Double crochet
Tbl: Treble crochet
Pattern
Ch 4, slst to first chain.
Round 1: Ch4 (this counts as 1tbl and 1ch), *tbl into centre of the ring, ch1,* repeat from * to * 6 more times, slst to 3ch of starting 4ch.
Round 2: Stst to first ch space, ch3, 2 tbl in same ch space, tbl in top of tbl below, continue around with 3 tbl in each ch space and 1 tbl in top of each tbl in round below. Slst to 3rd chain of starting ch3.
Round 3: Ch1, dc into same st, *chain 4, miss 3 tbl and dc into next tbl, ch6, miss 3tbl and dc into next tbl.* repeat from * to * 3 more times, but on last time, slst to first dc rather than making a new dc.
Round 4: Slst to ch space, ch 3, 2 tbl into same ch space, ch 1, *3 tbl into next chain space, ch3, 3 tbl into same ch space, ch1, + 3 tbl into next ch space.* repeat from * to* twice, and then from first * to + once. Slst to 3rd ch of 3ch.
Round 5: Ch4, 3tbl into next ch space, ch1, work around square working 3tbl into each ch space followed by 1ch on sides and 3 tbl, 3ch and 3tbl, 1ch into each corner. At last ch space 2tbl, slst to 3rd ch of starting 4ch..
Following round: Repeat round 5 as often as required, on every even round start with ch3, and 2tbl into same ch space, every odd row start with ch 4 as above.
Optional final round: Ch1, dc in each tbl and ch space in round below, slst to first ch, fasten off.
I love to see finished items made from my patterns, so feel free to pop along to my facebook page to share, I think that this would make a great blanket with all the squares fastened together.
Subscribe to:
Posts (Atom)