I've changed direction in recent years, those of you who noticed the name change might have picked up on that one. These days I'm mostly doing hand dyed yarn, buttons and hopefully I'll have some new patterns to release soon....
This change does mean one thing though, I need to have a bit of a destash of my commercially dyed yarn, so if you fancy grabbing some, you might want to pop along to my facebook page http://www.facebook.com/3bagsfullnz now, and check it out.....
15 June 2013


15 April 2013
Competition time!
Just thought I'd mention that I've got a bit of a give away running at the moment, with over $200 (NZ) worth of prizes. If you're interested you might like to checkout our facebook page and the hive and keep an eye out for my naughty kitten, who's been spreading my yarn around across facebook.....


13 February 2013
Wool you be mine? Free heart knitting pattern
Yet another last minute valentine, one of these days I'll get myself sorted sooner and not have to make these last minute. Gauge isn't important, and you can use any spare yarn that you have lying around.

Materials
Small amount of red yarn (I used Aran/10ply)
Suitable needles for gauge (4.5mm in my case)
Glue
Card
Abbreviations
Small amount of red yarn (I used Aran/10ply)
Suitable needles for gauge (4.5mm in my case)
Glue
Card
Abbreviations
K knit
P Purl
M1 make one
K2tog knit two stitches together.
Pattern
Bottom of heart
Cast on Two stitches
Row 1: K
Row 2: P1, m1, p1
Row 3: k1, p1, k1
Row 4: P1, m1, k1, m1, p1.
Row 5: K1, p to last stitch, k1.
Row 1: K
Row 2: P1, m1, p1
Row 3: k1, p1, k1
Row 4: P1, m1, k1, m1, p1.
Row 5: K1, p to last stitch, k1.
Row 6: P1, m1, k to last stitch, m1, p1.
Repeat rows 5 and 6 until the bottom of the heart is roughly the size that you want, (in my case 17 stitches) end with a row 6.
Repeat rows 5 and 6 until the bottom of the heart is roughly the size that you want, (in my case 17 stitches) end with a row 6.
Next row: K1, p to 1 stitch before centre of heart p1, cast off middle stitch (make sure you are left with an equal amount of stitches on each side, k1, p to last stitch, k.
Knit to centre of heart, (for me 10 stitches) turn leaving rest of the stitches un-worked.
Knit to centre of heart, (for me 10 stitches) turn leaving rest of the stitches un-worked.
Top of heart shaping
Row 1: P1, k to last stitch before cast off stitch, p1, turn.
Row 2: K2tog, p to last 2 stitches, k2tog.
Row 1: P1, k to last stitch before cast off stitch, p1, turn.
Row 2: K2tog, p to last 2 stitches, k2tog.
Row 3: P2tog, k to last 2 stitches, p2tog.
Continue until one stitch remains, fasten off.
Next re-attach yarn to un-worked stitches, work rows 1 -3 above on these stitches.
Making up
Weave in ends, and then glue to front of a card.
Write the card and give it to a loved one.
Making up
Weave in ends, and then glue to front of a card.
Write the card and give it to a loved one.
© COPYRIGHT Kelly Jo Sweeney 2013
This pattern is offered free of charge for your own personal use. Please do not make items using this pattern for sale. Should you wish to sell items made from this pattern, then please contact me for details of my Cottage Industry Licenses.
For yarns, more free patterns and knitting and crochet accessories, please see my site: http://www.wonderwool.congocart.co.nz
23 January 2013
Textured Dishcloth - free knitting pattern
Textured dishcloth
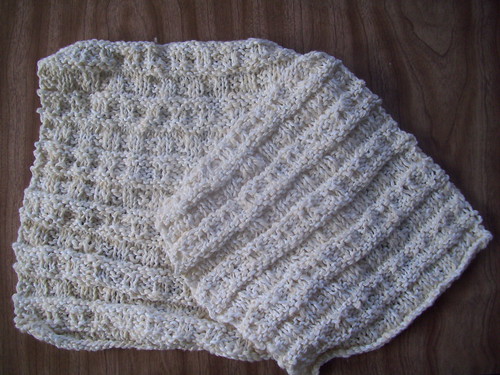
This pattern includes three different sizes of dishcloth, small (approx 17cm x 20cm), medium (approx 22cm x 24cm) and large (approx 28cm x 28 cm), or you can custom make one to your own size. A 50g ball of DK cotton yarn should be enough to make at least two cloths.
The pattern is worked on 4mm knitting needles, to give the following gauge:
30 rows to 10cm/4inch
21 sts to 10cm/4 inch
Cast on 36 (48, 60) stitches
Row 1: K
Row 2: P
Row 3: K1, p2, *k2, p2, repeat pattern from * to last stitch k1
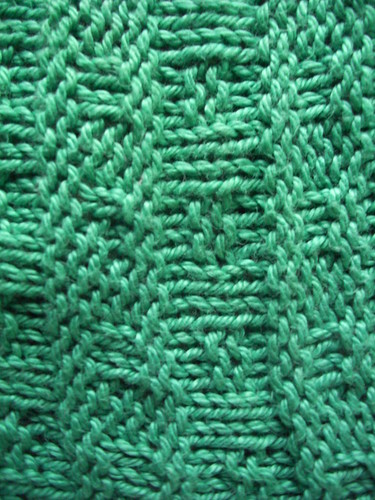
Row 4: P1, k2, *p2, k2, repeat pattern from * to last stitch p1
Row 5: K
Row 6: P
Row 7: P
Row 8: K
Row 9: P1, k2, *p2, k2, repeat pattern from * to last stitch p1
Row 10: K1, p2, *k2, p2, repeat pattern from * to last stitch k1
Row 11: P
Row 12: K
These 12 rows make up the pattern. Repeat all rows for 5 (6, 7) time in total.
Cast off.
© COPYRIGHT Kelly Jo Sweeney 2010
This
pattern is offered free of charge for your own personal use. Please do
not make items using this pattern for sale. Should you wish to sell
items made from this pattern, then please contact me for details of my
Cottage Industry Licenses.
For yarns, more free patterns and knitting and crochet accessories, please see my site: http://www.wonderwool.congocart.co.nz
06 January 2013
Last minute valentine - free knitting pattern
Last minute valentine

Materials
Small amount of red yarn (I used dk)
Suitable needles for gauge (4.5mm in my case)
Glue
Card
Bamboo coctail sticks
Pattern
Cast on Two stitches
Row one
Knit
Row two
Inc two stitches by knitting in the back and front of both stitches
Row three
Knit
Row four
Knit into back and front of first stitch knit to end knit into back and front of last stitch.
Row five
Knit
Repeat rows four and five until the bottom of the heart is roughly the size that you want, (in my case 20 stitches) end with a knit row, no inc.
Next row
Knit to centre of heart, (for me 10 stitches) turn leaving rest of the stitiches unworked.
Next row
Knit 2 together knit to last two stitches, knit two together.
Repeat this row until only two stitches remain, leave these on needle, and cut wool.
Next re-attach yarn to unworked stitches.
Next row
knit
Next row
Knit 2 together, knit to last two stitiches, knit two together
Repeat until only two stitches remain. Cut thread leaving long tail.
Making up
Sew in shorter ends but leave long end loose.
Thread a coctail stick into the four stitches you have left, glue the heart and coctail sticks to the card.
Wind the long thread into a flat circle shape and glue onto card so that it looks like the ball of wool that is being knit with.
Write the card and give it to a loved one.
© COPYRIGHT Kelly Jo Sweeney 2010
This pattern is offered free of charge for your own personal use. Please do not make items using this pattern for sale. Should you wish to sell items made from this pattern, then please contact me for details of my Cottage Industry Licenses.
For yarns, more free patterns and knitting and crochet accessories, please see my site: http://www.wonderwool.congocart.co.nz
28 December 2012
Simple baby hat free knitting pattern
I had some left over bamboo wool, and wanted to do a bit of practising with knitting in the round; my simple baby hat was born. You could use any scrap or left over wool for this, but the I found the bamboo quite stretchy, so you may need to cast on more stitches with a less stretchy yarn.
I knit the simple baby hat with a set of double pointed needles (dpn's) there's no reason why you couldn't do it with circular needles using the magic loop technique.
I knit the simple baby hat with a set of double pointed needles (dpn's) there's no reason why you couldn't do it with circular needles using the magic loop technique.
Simple baby hat free knitting pattern

What you need
To fit six month old baby approx.
4 double pointed needles, I used 3.5 mm ones
DK yarn, I used sirdar snuggly bamboo dk (about 1/2 a ball)
Cast 76 on stitches, putting an even amount onto three of the needles, leaving the fourth to knit with, knit the first round, joining together to form a round when you reach the end.
Now p1 round, k1 round, continue for 6 rounds.
Continue k each round until the work measures 14cm, or as long as you want it.
Cast off.
Turn the tube of knitting inside out, fold the top and sew together, across the top.
Turn the right side out, and there you have it, a very simple baby hat, knit in the round.
© COPYRIGHT Kelly Jo Sweeney 2009
This pattern is offered free of charge for your own personal use. Please do not make items using this pattern for sale. Should you wish to sell items made from this pattern, then please contact me for details of my Cottage Industry Licenses.
18 December 2012
Knitted San Pad - free pattern knitted cloth menstrual pad
I wrote this pattern for a knitted sanitary pad a good few years ago now, but decided to come back and update it a little now. It is a free knitting pattern, and you are more than welcome to make as many as you want for your own uses or charity. Should you wish to make them to sell, then please get in touch with me first.
I've used cloth menstrual pads for a long time, and when I created this I was wondering if a knitted one would work. I used a cotton yarn, but other fibres may well work. It is knit using the 'double knitting' technique. This means that you knit it flat, but it is knitted in one piece. It sounds, really complicated, but in fact isn't, and creates a knitted menstrual pad with very little sewing up to do. (Yay) Please try it, and if you have any problems, let me know, I will see what I can do to help.
Any way, enough of that, here it is, the knitted menstrual pad pattern (free).


I've used cloth menstrual pads for a long time, and when I created this I was wondering if a knitted one would work. I used a cotton yarn, but other fibres may well work. It is knit using the 'double knitting' technique. This means that you knit it flat, but it is knitted in one piece. It sounds, really complicated, but in fact isn't, and creates a knitted menstrual pad with very little sewing up to do. (Yay) Please try it, and if you have any problems, let me know, I will see what I can do to help.
Any way, enough of that, here it is, the knitted menstrual pad pattern (free).
Knitted Sanitary Pad
By Kelly-Jo Sweeney


This cloth menstrual pad/san-pro is knitted flat, but uses the double knitting technique, so that there is no sewing up required. It has a hole in the back which you can use to stuff the pad with either knitted pads, or pieces of cloth, depending on how much and what you want to add. It is very important that you slip stitches when told, as to knit (or purl) them will stop the technique from working. As you work, you will have the inside of the work facing you.
I knitted the pad in cotton yarn, but other yarns might also work well, I'd be interested in hearing of any other yarns that you have tried and how they worked. Feel free to give me feedback on the pattern too. You can contact me here.
You will need;
Small amount of DK yarn of your choice
1 button
pair of 5mm knitting needles
Stitch marker
Terms used;
k knit
p purl
sl slip stitch purlwise
PM place marker
YO yarn over.
K2tog knit two stitches together.
For the main pad;
Cast on 32 stitches
Row 1; k1, sl1, continue to end, turn.
Row 2; As row 1.
Continue in this way for 30 rows in total.
Make back opening;
Row 1; k1, sl1 to centre of work, 8 stitches. PM, turn.
Row 2; sl1, p1 to end, turn.
Row 3; sl1, p1 to end, turn.
Row 4; sl1, p1 to marker, turn.
Row 5; k1, sl1 to end, turn.
Row 6; k1, sl1 to end, turn.
Row 7; k1, sl1 to marker, turn.
Repeat rows 2 to 7 11 more times and then repeat row 2 to 6 once.
Next row; k1, sl1 to marker, remover marker and k1, sl1 to end, turn.
Next row; k1, sl1 to end, turn.
Work 28 more rows like this.
Cast off.
Now turn the whole thing inside out, through the hole that you created on the back, so that the right side is now facing you.
Making the tabs;
Fold the piece in half lengthwise. Count back four stitches from the centre.
With the top of the pad facing you, on the side of the piece pick up and knit eight stitches.
Row 1; P.
Row 2; K.
Work four more rows like this. *
Next row; k3 stitches, yo k2tog, k3 stitches.
Next row p.
Next row, cast off stitches.
Second tab;
Repeat the process as above, as far as *
Work two more rows and then cast off.
Weave in all ends and sew on buttons.
Inner Pads;
Cast on 16 stitches.
K each row until pad measures just shorter than the outer. Cast off.
If you have any thoughts on our knitted cloth menstrual pad, then I'd love to hear them, either in the comments or on our facebook page.
If you have any thoughts on our knitted cloth menstrual pad, then I'd love to hear them, either in the comments or on our facebook page.
© COPYRIGHT Kelly Jo Sweeney 2010
This pattern is offered free of charge for your own personal use. Please do not make items using this pattern for sale. Should you wish to sell items made from this pattern, then please contact me for details of my Cottage Industry Licenses.
Subscribe to:
Posts (Atom)